The Questing Knight is ambitious but blinded by her zeal. She will plunge forward where I would pause a moment to see the greater whole. She will lead us to glorious victory or a blood-soaked end, with no in-between.
The Knights get going after getting the realm all created with a hex map. Sections for RPG Thoughts, Realm Creation and the first Scenes.
Following on from the RPG Intro and Char Gen.
Mythic Bastionland solo - intro | start | partway | finish | all season 3 | all rolling solo
Disclosure - I'm a DriveThru RPG affiliate
Starting with Mythic Bastionland
bastionland thoughts | solo tools | realm creation | scenes | chars
Adding to initial intro of Mythic Bastionland.
The first part after character generation was Creating the Realm, covered below.
So far Mythic Bastionland has been an easy game to run solo. Once you understand the Travel section, the other parts of the system all start to slot in. The core procedure is the travel between hexes, encountering the Omens of one or more Myths (not at the same time) or the features of the hexes you pass through.
There's the ability to zoom in, for combat or talking in encounters, or exploring a hex in more detail. And the ability to zoom out, for more Dominion related actions, warfare, thinking about things in the realm or the passing of Seasons or even Ages.
I've had one combat so far, but that went quickly and smoothly. Compared to Electric Bastionland, there are more mechanics and options than Electric Bastionland (but still a simple system that fits on 2 pages).
Knights have three Feats that only they can use (Smite, Focus, Deny), adding a little strategy and durability, but as a limited resource (one to a few times a combat). Extra damage dice that get a 4+ can be used for Gambit effects such as Bolster (extra damage), Move (after attacking) and hindering foes by pushing them away, tripping them or trapping weapons and shields. Damage dice of 8+ can be used for Strong Gambits (same but better). There's also some bits on mounted combat, jousts, shieldwalls and morale.
Like Electric Bastionland, the book is cleanly presented and easy to read. There are lots of sections to help with play examples and (design) thoughts. Ones such as Gambits, Getting Stuck, Death and Omens.
The art and design are some of the most evocative I've seem, matching the material perfectly.
Solo Tools - Juice Oracle and Bastionland Tables
bastionland thoughts | solo tools | realm creation | scenes | chars
Following on from Solo Tools notes.
I haven't used Juice Oracle so far as much as I have some oracles and their tables. This is because Mythic has it's own solid random tables and spark tables. And second because the Juice Yes/No oracle is a little...strange.
First up the central tables of Juice are fine. There's lots of them and they're easy to navigate round (I've printed out a physical copy as always). It's designed to be used as a fold-up format but I'm too lazy to take it out of the printed pages. There's a few tables I need to turn upside-down to read but I'm ok with that.
The Yes/No oracle uses a pair of dice for the main Yes/No/Maybe and an additional die for the severity. One Page Solo Engine does something similar, as well as some of the variants for Plot Unfolding Machine. The two dice give results of yes/no and have columns for "likely" and "unlikely" likelihoods as well as the 50/50. One result also triggers
But the dice used are...Fate/Fudge Dice, specialised d6s with 2 x "+", 2 x '-" and 2 x blank sides. They are for use with the Fate rpg, and I once had some before deciding I'd likely never actually run or play Fate. They can be replicated with d3s (which is what I did), but are a strange choice for an oracle. There are 9 equally-weighted possible outcomes for the table (3x3), and I replaced it with a d10 to make my life easy (re-rolling a 10).
I quite like having one result as Event / Invalid question / assumption and having a d6 for the weight of the answer is always nice to use if you want to lean in to it.
Mythic Bastionland has 7 prompts on each Knight page, and six prompts on each Myth page, for a total of 13 x 72 (Myths and Knights) prompts, including names, locations, people and objects. These are more than many oracles have. More importantly, they are specific to the system being used, which is hard to beat for any 3rd-party oracle. There are also a few spark tables (2 x d12s), with all 36 crammed into the back page of my book.
I'll try out the Juice Oracle tables some more, butI suspect the Mythic Bastionland ones will do much of the heavy lifting!
Creating the Realm
bastionland thoughts | solo tools | realm creation | scenes | chars
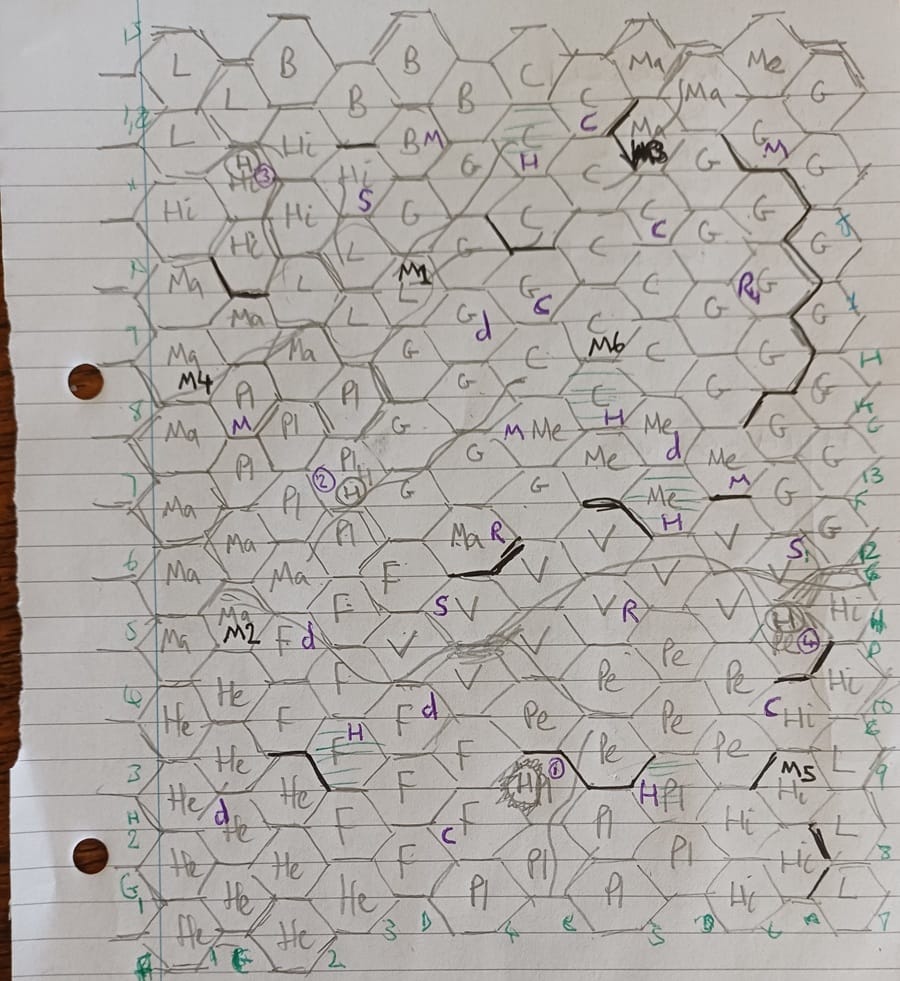
The 'Creating a Realm' section is a single page, with loose a loose procedure for creating a 12x12 Hex Realm. There's also a Realm Map Tool online that will do it for you.
After creating a 12x12 hex map (hex paper is good if you can get hold of it), you'll split the realm into areas of terrain (Crags, Meadows, Forest etc) 1-12 hexes or so in size. Then add Barriers (between hexes), 4 Holdings (where most population live) and six Myths. Then 3-4 of each of six types of Landmarks spread across the realm.
Mine ended with a long valley with a Seer living at each end, which made a good place to get the characters started.
The procedure was easy to follow and gives an excellent unique place for your Mythic Bastionland adventures. I don't feel my solo game has been spoiled by having a vague outline of the realm. Although I rolled to place my Myths, you could easily keep them a surprise, only rolling when you need to find out the first Omen or what Myth is actually on the nearest Myth hex.
Tales of Willow Knight and Questing Knight
bastionland thoughts | solo tools | realm creation | scenes | chars
The viewpoint character is Ser Litwitte, Willow Knight.
Scene 1 - Vale of the Seers
All Knights carry their story. In their weapon, their stance, their steed, their companions. The Carved Seer knighted me, seeing my destiny in the her healing wounds. She saw a great peace after a terrible war and the Questing Knight was to be a part of it. A vision led me to Ser Gloria, and we made a pact to seek glory in the Realm to the West. We have come to the Vale of the Seers with our squires. So we Seek the Myths, Honour the Seers and Protect the Realm...
Ser Litwitte and Ser Gloria enter The Veiled Vale (Hex 11F) in the mountains, also known as the Vale of the Seers.
(Sanctum - falconer's hut)
They are greeted by a falcon, which leads them to a red-headed gaunt woman. After a brief discussion the two Knights leave their squires, following the falcon high on a nearby peak. They sit before the Veiled Seer, obscured by horselike hair.
At dusk she points north-west and speaks a single word to the Willow Knight.
"Bones"
Scene 2 - Truth of Bone
Ser Gloria and I debated what we will find, whether blessed bones of a dead seer, someone that needs burying or a savage beast on a pile of bones. The Questing Knight is ambitious but blinded by her zeal. She will plunge forward where I would pause a moment to see the greater whole. She will lead us to glorious victory or a blood-soaked end, with no in-between.
Morning sees knights and squires descending through mists and out of the Veiled Veil, still with the falcon. They come across twisted bones beneath a wilting tree, but know not what to make of them (Hex 11G).
Travel on to come out of mist into verdant meadow (Hex 11H) and the falcon leaves them behind. Soon they come upon stone steps leading below a huge black tree.
Leaving Ursell behind with the horses they explore. Ser Floria plunges down into twisting passages where they are met by lurking figures of bone. There's an intense fight, Ser Floria, Ser Litwitte and Dorza are injured, but Floria's sword prevails each time against the creatures of bone.
Scene 3 - A Sister of Power
This time Ser Floria brought us victory, if you can call it that against these creatures of Bone. After we rested Ser Floria swore an oath to me, to see her Quest to destroy the source of these creatures. And so our path is set, to victory or death...
After a night in the wilds, the knights wander the meadows and find a walled compound (Hex 12I). Exchanging words with those within and proving they were of the living, they were let inside.
They were doughty warriors, their commander Chider, sister to the ruler. She is also vassal to the ruler and no knight and didn't say why they were here.
On hearing they were sworn to destroy the creatures of bone, Chider and her warriors told them of the area. The source of the bones was in the crags above, beyond a perilous crossing. They also told of a sacred place, to the south-east, a huge banner.
They rested among these warriors, a respite before the next dangers.
Next Expected Scene - At the Banner
Character and Notes
bastionland thoughts | solo tools | realm creation | scenes | chars
Ser Litwitte, Willow Knight
male knight-errant, Memories of Home (Castle, Fire), Knighted by The Carved Seer. No-nonsense, wiry and lean, melodic voice with passionate manner. Cautious demeanour and interest in fashion.
VIGOUR 12, CLARITY 17, SPIRIT 16, GUARD 5
- Youthful Energy (once, treat a Mortal Wound as a Normal Wound)
- Bend with the Wind (when use Gambit to Move, Armour 4 until next turn, doesn't stack)
- Passion: Doubt (restore SPI when defer to someone more senior, even tho disagree)
Equipment - old sword (d8 hefty), half shield (A1), gambeson (A1), dagger (d6), torches, rope, dry rations, camping gear, cautious steed (VIG 10, CLA 15, SPI 5, 2GD)
Ser Floria, Questing Knight
female knight errant, Knighted by The Buried Seer. Overly familiar, zealous, from somewhere cold. Delicate physique, decorated dress. Prying demeanour, ambition for knowledge.
VIGOUR 13, CLARITY 2, SPIRIT 15, GUARD 5
- Cold Stone (can absorb ailment from wielder, vanishing in a burning light, restock each Season)
- Pledge Quest (swear quest, until complete it cannot restore GD, but +d12 on attacks vs those stand in way. Lose d12 SPI if abandon quest.
- Passion: Impetuosity (restore SPI when first to fight)
Equipment - massive ancient sword (d8 long, from a tomb), kite shield (d4, A1), 3 javelins (d6), dagger (d6), torches, rope, dry rations, camping gear, reckless charger (VIG 14, CLA 6, SPI 6, 1GD, d8 trample)
2 Squires -
- Ursell, dour, righteous, VIG 3, CLA 6, SPI 6, GD 1, pony (VIG 7, CLA 7, SPI 2, 2 GD), 3 javelins (d6), dagger (d6)
- Dorza, knows everyone, motivated by fear, VIG 7, CLA 4, SPI 3, GD 1, pony (VIG 7, CLA 7, SPI 2, 2 GD), shield (d4, A1), dagger (d6)
Finishing Up
They have a clear quest, a place to go and potential allies. What could go wrong...?